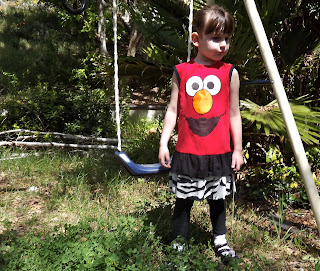
Things you will need:
1. A character shirt that is one to two sizes larger than your girl's typical clothing size. You want a larger shirt because a dress is typically wider than a girl's shirt.
3. Sewing machine
4. Contrasting fabrics: decide which two fabrics you want to use for the bottom of your dress.
5. Pins
 |
Starting with the original boys t-shirt, remove both the sleeves by cutting on the inside of the sleeve seam.
Next, remove the hem. I simply cut the hem off my garment. I made my cut directly above the stitching.
 Next, measure the bottom width of your shirt. Let's say my shirt was 30 inches in width. I decided to add 20 inches to my width. I added those inches by cutting my front and back pieces, of each tier, 25 inches wide. I made the bottom tier 8 inches long and the top tier 4 inches in height. Therefore, I cut two pieces of zebra fabric measuring 8 x 25 inches and two pieces of solid black measuring 4 x 25 inches.
After I was finished cutting my tier pieces, I sewed the front and back sides of the tiers together.
I did not choose to make one long 50 inch piece of each fabric because I didn't want the joining seam in the middle of the back of the dress. I chose to make two pieces and join the pieces on either side in order to create seams on both sides of the garment.
Next, each tier needs to be gathered at the top. Gather the tops of the tiers by taking each top and sewing a straight stitch, set at the stitch length 5, across the length of the top of the tier.
Gather your tiers so that each tier has a width that matches the width of the bottom of your character shirt.
Lay the top tier over the bottom tier and then baste stitch these two tiers together. Be careful to insure the top edges of the gathered fabric are not twisted and bunched under. Make sure your top edges remain fresh on top of your basting stitch.
After your tiers are basted together, turn them inside out. Next, place the character shirt bottom inside your tiers so that the right side of the character shirt is up against the right side of your upper tier. The wrong side of the bottom tier should be facing you.
Next, pin the garment together, ensuring that the top edges of the gathered skirt are fresh on top. Also, make sure to start pinning at the seams of each side of the tier skirt. You want to ensure your sides line up at the side of the character shirt.
When working with gathered skirts, I go pin crazy at first. I want all my edges to make it into my serger without sticking out the other side of the garment and forcing me to seam rip out areas to get the edges into the sewing machine. So, you should start out by doing a lot of pinning.
However, when it comes to sewing, to get started serging your garment, you will have to remove a few pins to get the seam area into the serger.
Your finished seam should look like the photo I have included. You will end up with a successfully attached tier skirt.
Next, measure the width of your arm holes. My arm holes were 13 inches in circumference. I used fold over elastic and just capped the edges of my sleeve holes. I know most people don't make potty training pants and don't keep fold over elastic at home. If you don't have fold over elastic, go ahead and make yourself some bias tape or purchase bias tape at your local fabric store.
You can cap the edges of the raw sleeves with bias tape. Then, sew the bias or FOE onto your arm hole.
Ta Da! You have your upcycled character shirt.


5 comments:
T that is so cute. Good job I found you at Show and Tell Saturday. I'm your new follower and I would Like to invite you to come link up at my Sunday party it opens tonight and is open till next Saturday. @ http://www.arosiesweethome.com/
Also I would love it if you would like to follow me too
Thanks,
Rose
Thanks for the kind comment Rose. I will pop over tonight for sure. Bren
This is absolutely darling! Thanks for sharing at oopsey daisy!
Cute!! Looks like a very comfortable dress to play in!
Thanks for linking up at Scout's Sweet Sundays!
Post a Comment