I am an ebay shopper for children's seconds. Sometimes ebay purchases are a problem because the condition of the child's clothing (or shoes in the case) is not accurately described. This tutorial arose from just such a problem; I ordered a pair of fabric lined Crocs from a seller claiming the shoes were in Excellent Used Condition. I received shoes in trash condition. I wanted to keep the shoes because I needed a pair kick around shoes that can get dirty and don't require socks.
My first refresh on these shoes was to remake the insoles. The original insoles were lightly fabric coated. The shoes arrived with the fabric coating completely worn off and the insoles hard as rocks. I solved the problem and improved the product.
This tutorial is a post hoc production. The photos are taken using examples of the exact sole I made.
Things you will need:
1. cotton sherpa or any kind of fabric used to line the raw insole.
2. air foam insoles, these are adult size and very inexpensive
3. a cutting devise
4. adhesive spray or glue gun
5. old insoles from your child's shoes
6. sewing machine with zig zag stitch
7. thread
First, I used a pair of air foam insoles. These insoles cost $2. Next, I used the old insoles to cut the pattern of the new insoles. Simply lay the old insole over the new adults size insole. Then, cut the child size insole to match the shape.
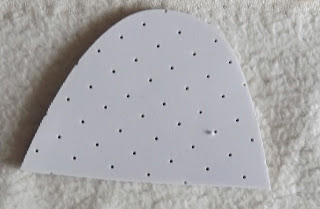
You end up with a new child size insole.
This photo is of the insole after I cut out the child's size shape I needed. Again, this is a post hoc tutorial and I hope the reader understands that the old insole was laid upon the top of the new insole and then I made the cut that produced the photo.
Next, you will need some cotton sherpa fabric. Really, you could use any fabric. In this case, I used cotton sherpa fabric that I had laying around from making potty training panties.
Lay the new insole on top of the cotton sherpa and cut the sherpa into the shape of the insole. Make sure you cut the sherpa while the fabric is laying right side up. In so doing, you will ensure the looped sherpa side of the fabric will be against the child's foot.
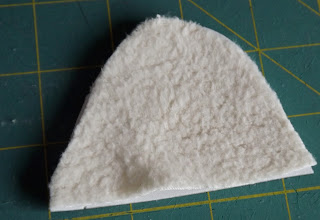
The photo on the left is an example, as I already made my insoles and put them in the shoes before creating this tutorial. In this photo, you see I have laid the insole on top of the sherpa to cut my needed shape.

The product: You end up with your insole and your sherpa in the same shape.
Next, you will need to grab your adhesive spray.
Turn the cotton sherpa over to the wrong side and spray a bit of adhesive on the wrong side of the cotton sherpa fabric. This spray does not need to be exact but it does need to be in the center away from the edges. I do not sew on something with adhesive directly under my needle because the adhesive goo can stick to the sewing needle, creating a mess and sewing machine problems.
After applying adhesive, place the top of the insole onto the bottom of the sprayed cotton sherpa and press down firmly. You end up with the cotton sherpa stuck to your insole. This process will keep the sherpa stuck in the correct position while you sew the edges of the sherpa to the insole.
It is best to sew the edges onto the insole because the moisture from the feet, inside the shoes, can loosen the adhesive leaving the sherpa free to move around under the feet during use. This is not our desired goal and sewing is needed to seal the deal.
Place the edge of the insole, sherpa side up, under your presser foot with the machine set to zig zag stitch. Sew the entire edge of your insole with the zig zag stitch.
You end up with a new sherpa lined insole in child size.
The cotton sherpa lined insole, as photographed, refreshed these otherwise throw away shoes. Making your own cotton sherpa insoles can be done to replace ugg boot insoles as well.
In my case, I was taking a product that was not usable and making it work. Now, I have a pair of crocs my daughter can use for the beach or other events with lots of dirt or sand while needing good thick shoes without socks.


 Making leotards is a staple sewing activity for me. My Leotots ETSY shop was created for loetards. I started sewing simple sleeveless tank leotards out of necessity because sleeveless garments are easy when learning how to sew on a stretch fabric.


